
How To Install Kali Linux Alongside Windows 10
In this tutorial, you will learn to dual boot Kali Linux and windows 10. Dual booting Windows 10 and Kali Linux is a simple process if you do things accordingly, this tutorial will cover every step needed to install Kali Linux on Windows 10 as a dual boot.


Follow these simple steps in order to dual boot Windows 10 and Kali Linux without any errors and not losing any of your data. This tutorial will work with every version including Kali Linux v2017.1.
Things needed to dual boot Windows 10 and Kali Linux.- A PC/Laptop must have at least Dual-Core processor with minimum 1GB of RAM
- 8GB USB
- Windows 10 or any other version of Windows i.e 10/8.1/7 installed.
- Kali Linux → Here
- Rufus → Here
Let’s begin to install Kali Linux on Windows 10 as a dual boot.
Step 1: Download Kali Linux
To dual boot Kali Linux the first thing you need is a Kali Linux ISO if you don’t have it yet follow these steps;
Choose between 32 bit and 64 bit according to your System types. To find out your system type right click on This PC(My Computer in the older version of windows) and choose Properties you will see your system type there either 64 bit or 32 bit.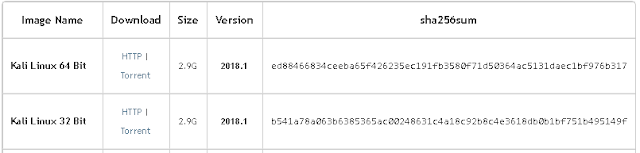

Step 2: Create a Bootable USB
To use the Kali Linux ISO you need to create a bootable USB(Pendrive). I am using Rufus to create Bootable USB. Connect your USB and Run Rufus You will see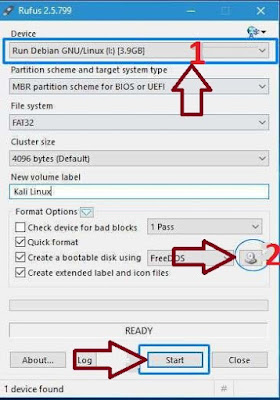

- First one is you USB.
- Select the Kali linux ISO by clicking the CD icon.
- Press the Start button new popup will open just click on OK. It will give you a warning message, saying that all data on the USB will be erased.
Step 3: Create a separate partition
So far you have downloaded Kali Linux iso and created a bootable USB by using the iso. Now you need to create a separate partition to install Kali Linux. Go to Disk management setting by right clicking on This Pc icon and choose Manage, or just type diskmgmt.msc on CMD and press Enter to open Disk management setting.
Choose a partition which has free space right-click on it and choose Shrink volume. Allocate minimum 15 GB(15000 MB) I recommend 30 GB(30000 MB) for the Kali Linux partition.

Step 4: Change BIOS settings and choose Graphical Install.
Go to your BIOS setting and disable Secure Boot and Fast Boot options (to disable fast boot click start then type Control Panel in the search box. Click Control Panel. Click Power Options. Click Choose what the power buttons do. Click Change settings that are currently unavailable. Scroll down to Shutdown settings and uncheck Turn on fast startup. Click Save changes.)
Restart your Pc and choose boot from USB. You will see Kali Linux installation options, Choose Graphical Install.

Step 5: Choose the Language
Select the language to be used and press Continue.

Step 6: Select Country
Select your Country and press Continue

Step 7: Choose Keyboard layout.
Choose American English as a keyboard layout. You can choose your own language but English is mostly is used.

Step 8: Set Your IP configurations
Next step set your IP configurations. Select your network card and press continue

Step 9: Hostname
In next it will ask for a Hostname. Type any name you want

Step 10:
In the domain name field, don’t type anything, leave empty and press enter.
Step 11:
Choose a password for the root user and press continue.

- Step 12:
This is the most important part, most users make mistake in this step and wipe out their data. Choose partitioning method as Manual and click Continue.

- Step 13:
Select the partition you created earlier using the disk management settings. Be carefuldon’t select any other partition.

- Step 14:
Choose Delete the Partition and click Continue.

Step 15:
Now you will see Free space select it and press continue.

- Step 16:
Choose the option Automatically partition the free space and click Continue

- Step 17:
Next, choose the option that is recommended for new users Which is the first one and press Continue.

- Step 18:
Select the option Finish Partitioning and Write Changes to Disk and press Continue.

- Step 19:
It will ask for permission to write changes on the disk. Choose Yes and press Continue.

- Step 20:
During the installation, it will ask for network mirror. Choose No and press continue but if you have internet connection you can choose Yes.

- Step 21:
After some time it will ask for installing GRUB boot loader, choose Yes and press Continue.

- Step 22:
Carefully Choose your hard disk which is the second option. Only choose your hard disk to install GRUB. Otherwise, you won’t be able to use both the operating systems.

Step 23 to dual boot Windows 10 and Kali Linux:
After successful installation, you will see this screen. Remove the USB, press Continue and restart your PC.

Final Step to dual boot Windows 10 and Kali Linux:
This is the start up screen, you can choose between kali Linux and your Windows OS.

Enjoy your experience with the Kali Linux
If you face any issue during the installation process, feel free to ask in the comment section.
0 Response to "How To Install Kali Linux Alongside Windows 10"
Post a Comment